Fashion, Lifestyle

The Tie – Dye Trend – A Fun DIY

The Tie – Dye trend is strong this season and I am totally here for it. I am not going to lie when I saw this 70’s trend making its comeback I had my doubts but I am loving how easy it is to style it and add a pop of color to the wardrobe.

What was once only a school arts and crafts project is now making a serious comeback. The new trend has been embraced both on and off the runways in a more elevated and fashion forward way. It is one of those trends that quickly moved from the runways to the streets.

The new elevated Tie- Dye trend feels bohemian but tailored and nostalgic but contemporary. What I love most about this trend is how easily accessible it is and so many different ways to style it. The Tie – Dye trend today is not restricted to t-shirts alone but is seen on jackets, coats, jumpsuits, dresses, swimsuits, skirts, scarves, bags, shoes, bedsheets, pillow covers, cushions, and so much more. The options are endless.

This trend has literally something for everyone. If you find the loud colors not your style I highly recommend going for muted colors to tailor this trend to suit your requirements.

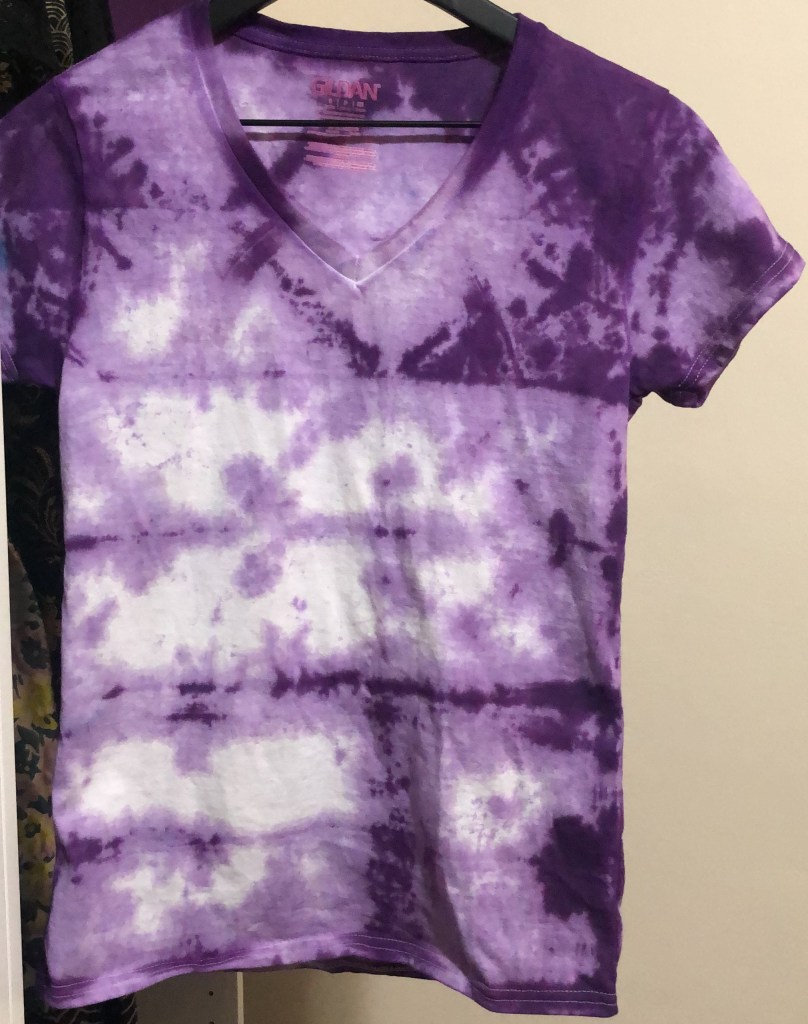
And the best thing is you can even DIY if you are looking for a fun project. It is easy, fun and can we done by anyone kids as well as adults. My husband and I created our own Tie- Dye T-shirts (His and Hers) and a baseball cap as a part of a date night idea where we got messy and had some fun. I am going to try doing a few other things as well. These are fresh out of the dryer so haven’t ironed them yet.

We used this Tie – Dye Kit which includes 12 squeeze bottles contains dyes, 16 protective gloves, 40 rubber bands, a reusable surface cover and a project guide. Since this kit already has bottled pre filled with powdered dyes all you need to do is add water to the bottles and shake to mix it up making it super easy. This kit can dye upto 36 projects. There are many small kits available too for someone who is looking for only a project or two. The best thing about this kit is it includes all the essentials you need to get creative and create unique pieces and it works on cotton, rayon as well as silk. Additionally, you will need a white t-shirt (got ours from Michaels) or any other fabric you are dying, plastic bags (to keep the tie-dyed fabric in place without disturbing it for the fabric to pick up the dye colors).

Happy experimenting and having a fun time! Feel free to share your Tie- Dye DIY projects or fun tie dye ideas with me.

Lifestyle

DIY Candle Holder – In Less than 10 Minutes

I love how candles instantly make your house look cozy and add the same time add the perfect ambiance to any room. They are a great addition to coffee tables, book shelves, mantel, in the dining room as centerpieces, or also in the bedroom.

Today, I wanted to share with you a quick and easy DIY Candle holder which can add to the decor of the house. You can easily make as many of them to use as centerpieces on the dining table or as you please.

Materials Needed:

Tumbling Tower Game (A mini one)

Black Spray Paint

Sand

Cylinder Glass

Wood Glue

Led Candle – Pick one that fits inside the cylinder glass.

Directions

The first thing I did is washed the clear bowl with warm soapy water to ensure that there are no prints on it and remove any stickers.

Next, I took 4 tumbling tower pieces and using the wood glue stuck them forming a square as per the photo below.

Later I took another 4 tumbling tower pieces and created a cross sign as per the below pictures.

Once you have created the cross sign add some wood glue to the centre of each tumbling tower piece of the cross and stick the square created above diagonally on it as per the picture below.

Once you are done with this, you will need 4 more tumbling tower pieces and stick each vertically on the edges as the below picture using wood glue.

Let it dry for sometime and spray paint the entire piece using a black spray paint in a well ventilated area. Do not miss to spray paint the sides. Let it dry completely.

Once the holder is dry, simply add some sand to the cylinder glass and place the LED candle inside it. It is ready to use.

Thank you for visiting the blog today and hope you enjoy creating this DIY Candle Holder.

Lifestyle

DIY Sunshine Vase – In less than 30 Minutes

Spring is finally here and I cannot get enough of flowers and plants. Especially in these times when we spend more time at home, color and greenery immediately uplifts me and makes me feel happier. I had some supplies at home and decided to use them to create a sunshine vase. Sharing this super easy and quick DIY with you.

Materials Needed

— Pearl Stickers

— Spray Paint of your choice (I used Yellow Gloss)

— Durable Topcoat (I used Gloss)

— Clear Glass Bowl

— Faux Flowers/Real Plants or Flowers

I got all my materials from Michaels and they are still doing delivery.

Directions

The first thing I did is washed the clear bowl with warm soapy water to ensure that there are no prints on it.

Next I took the pearl stickers and stuck them on the clear glass bowl in the design or pattern I wanted. I created a diamond shaped pattern. The pearl stickers do not need any additional adhesive to stick that what is already on them which makes it really easy for anyone to do including kids with minimal materials.

Once the pearl stickers were applied, I took the glass bowl outdoors to spray paint in a well ventilated area and spray painted the entire glass bowl yellow turning the glass bowl upside down for easier application.

You can keep adding coats of spray paint as long as you get the desired color. Just remember to keep an interval of at least 15 minutes between each coat.

Lastly, seal it with a topcoat of your choice – gloss or matte. And let your vase dry for a minimum of 24 hours.

Once the vase has dried add faux/real plants or Flowers and add them anywhere in your house. I ordered some Tulips with my groceries and added them to add a touch of spring. After all, what says Spring more than Yellow + Tulips.

Hope you enjoyed this easy DIY and have fun creating it!!

Lifestyle

DIY Plant Pots in less than 30 minutes

I love the versatility of terra cotta plant pots especially since there are so many easy ways you can turn a simple pot into a work of art. I have been looking to add some plants inside the house to add a fresh look to the house and adding some character. I love succulents as they require minimal care and and work both indoors and outdoors. For this project however I am going to use faux succulents but you can easily replace them with real plants.

Material Needed:

  • Terra Cotta Pot
  • A paint Brush/ Sponge Brush
  • Paint Palette
  • Faux Succulents/ Real Succulents and Dirt or any other plants
  • Craft smart – Premium Chalky Acrylic Paint (2 colors- Linen and Rich Brown)
  • Thick White Paper (to keep your workspace clean)

Step 1: Working on the thick white paper, using the linen chalky paint start dabbing your terra cotta pot with paint all over using a paint brush or a sponge brush. Do not just simply run smooth strokes like you would paint instead apply paint by dabbing on the pot to give it some texture.

Step 2: Then to give it a more weathered effect just take very little Rich brown Chalky Acrylic paint and start dabbing it on the pot with your paint brush. Keep dabbing it till you get a look you are looking for. You can give it a very vintage look or keep it slightly vintage.

Step 3: If you feel like you have excess of the Rich brown chalky acrylic paint making it look more vintage than you like then redo step 1 at spots that need any corrections.

Step 4: Also paint the inside of the pots that the brown color of the terra cotta pot is not seen even when you place your succulents. Use the linen chalky color to paint the same. You can paint half of the inside or the whole inside pot as required.

Step 5: For real plants put a dish below and you can plant your succulents adding dirt or for faux plants I just added stones to stuff the pot and decorated the pot with the faux succulents.

Step 6: You can make just one and use it as a centerpiece or make 3 of the same kind and use as a centerpiece to decorate your dining table or any other space you like.

These pots are really easy to make and can be a great project to do along with your kids or friends. They are also a great idea for gifts to bridesmaids, to say thank you or even to add to a hamper for all succulent lovers. A great part about them is that I can easily move them to other parts of our home and they are an inexpensive way to add some character to the house. I can easily remove the faux succulents and use them in other containers. It is also a great idea for staging your house for a sale. The possibilities are endless. I can’t wait to see what you come up with!

Lifestyle

DIY Jewelry Organizer Tray – In less than 30 minutes

Jewelry Trays are so fun and colorful to create using Sculpey and a fun way to add a pop of color to your wardrobe. From solid colors, to interesting patterns, different shapes and more, the possibilities are endless. Here are a few tips I would like to share with you to create a jewelry tray in no time. Seriously, its fun, useful, easy and addictive!

Materials Needed:

  • Sculpey soft clay
  • Clay Roller/ Rolling pin
  • Butter Knife
  • Cookie/Clay cutters – Different shapes (not necessary – made this one without any cutters)
  • Thick paper or Ceramic tile (to keep your work space clean)

Step1: Working on the ceramic tile or thick white paper, roll your sculpted clay using your hands to form thin ropes of all the different colors you want to use.

Step 2: Twist all the ropes together interlacing the colors into one large rope.

Step3: Continue to twist and turn the rope and fold on top of itself, mixing and swirling the colors together.

Step 4: Using your hands, make the rope in the shape of a ball and flatten the ball using a rolling pin. Avoid it being too thin or too thick; you will want to get it to about the thickness of a quarter. I selected a mix of 2 colors here but you can mix and match as many colors you like or use only one solid color. I used a piece of white and a piece of violet.

Step 4: If you want to make the shape more natural like me just use your hands to give it the shape you like or use clay/cookie cutters to give it any shape you like. You can also use a bowl to give it a round shape.

Step 5: Preheat the oven to 275 degrees Fahrenheit . Transfer your tray on a parchment paper, and bake it for 15 mins for a tray having thickness of a quarter inch. If your tray thickness is more it will be needed to be baked for longer. Follow the instructions on the clay you are using for baking instructions. If you feel the clay does not fold the shape you can even put the tray over an oven safe bowl and put it to bake.

Step 6: Let the tray cool. Once completely cool, paint the rim for detail or leave it as it is. Place your favorite jewelry inside.

These trays are so easy to make and can be made in various shapes, colors and styles. They also make a great gift to give to your friends or simply enjoy yourself. I can’t wait to see what you come up with!